How I 'hacked' my air purifier
This tale begins of a interest in acquiring an air purifier for my apartment. I had began to notice what looked like a small amount of black mold in my guest bathroom, and because I rent, I wanted a way to ensure the air in my apartment was healthy to be living in. While I am aware this won’t be fixing the root problem, I was interested in mitigating it to help improve sleep and my overall well-being. I looked around online for air purifiers that provided remote access without a cloud connection, but I couldn’t find any. My next best option was to modify a device that had a cloud connection.
Why does a air purifier need to reach out to the internet to be able to control it from inside your home? Seems like a huge waste of time and energy.
I wanted to find a product that met the typical standards of my smart household - disconnected from the cloud and accessible via Home Assistant - all while supporting the main purpose of improving the air in my apartment. After doing the usual Google-fu, I came across some Reddit comments stating that there were some air purifiers on the market that came with a cloud integration, but that could be flashed with ESPHome. This was great, as it meant I had a way of getting a high-quality air purifier without sacrificing the goals of my home. The product being described was the Levoit Core 300S. This product looked good, however it didn’t appear to be big enough for my living room, so I continued digging and found the Levoit Core 400S. The product uses an app called VeSync, to connect to the device through the cloud. The online comments I had been reading mentioned there was an ESP32 on-board which is the perfect SoC, since I had already had experience with it when I made my KVM Switch smart and recently, made a moisture and temperature soil sensor (post coming soon).
At this point though, I was gambling with the reality that the device really had an ESP32. Before arrival, I had came across a GitHub Repo (https://github.com/acvigue/esphome-levoit-air-purifier) that provides a custom ESPHome firmware for the Core 300S. On the README, it mentioned it supported the Core 400S but confirmation was needed to verify that the code written for the device actually worked. I originally read ‘Needs confirmation’ as ‘the software written for the 300S needs to be verified as works on the 400S’, but it turns out the developer behind the project had implemented some support for the 400S device. Regardless of this notion, I did what any wannabe electrical engineer would do - I bought the product, and immediately on arrival, disassembled the thing as quick as I could to get to the logic board.
The device took many sentence-enhancers to open. These are the steps that briefly summarize how to disassemble the device:
- Flip the Core 400S over and unscrew the bottom, exposing the air filter.
- Remove the air filter.
- Locate the 6 screws and unscrew them. Warning: I was unable to get these screwed back in after removal.
- Once all screws were removed, the pry tabs that surround the screw holds need to be held open. The best advice for removal is to get some butter knives and pry them into the pry tabs, releasing 3 of the 6 total tabs. Without assistance from someone else, you’ll need a way to separate the two ends being held together by the tabs. The way I was able to get it apart was by wrapping my legs around the top half of the device and pulling when the tabs were released.
- The air purifier should be able to able to pulled apart partially, not entirely. Do not pull with force, as the only reason the device doesn’t fully disassemble is due to the two cable connections that connect the touch-capacitive display and controls to the main logic board.
- After pulling the bottom half of the air purifier as far apart from the logic board as possible, you should be able to see the two cable connections holding the purifier together through the two handle holes. This is the fun part, and you can get incredibly creative with. In my case, my buddy was able to use two of the butter knives to disconnect the cable connections. The cable connections have a push button, meaning pressure has to be applied where the cable connects to the display. This part can be incredibly challenging as you have very limited visibility and you have to maneuver the knives in a way to get the cables to disconnect. It’s probably a bit late to say that you should likely be trying to do this disassembly if you are incredibly patient and have the capacity to deal with it at least 30 minutes.
- Cables are finally disconnected! Great! You can now separate the top from the bottom of the air purifier. After removing the blower fan, you should have direct access to the main logic board. There will be pry tabs, you’ll need all of these pried up simultaneously in order to remove the logic board.
Great, we finally have the main logic board out! Now what?
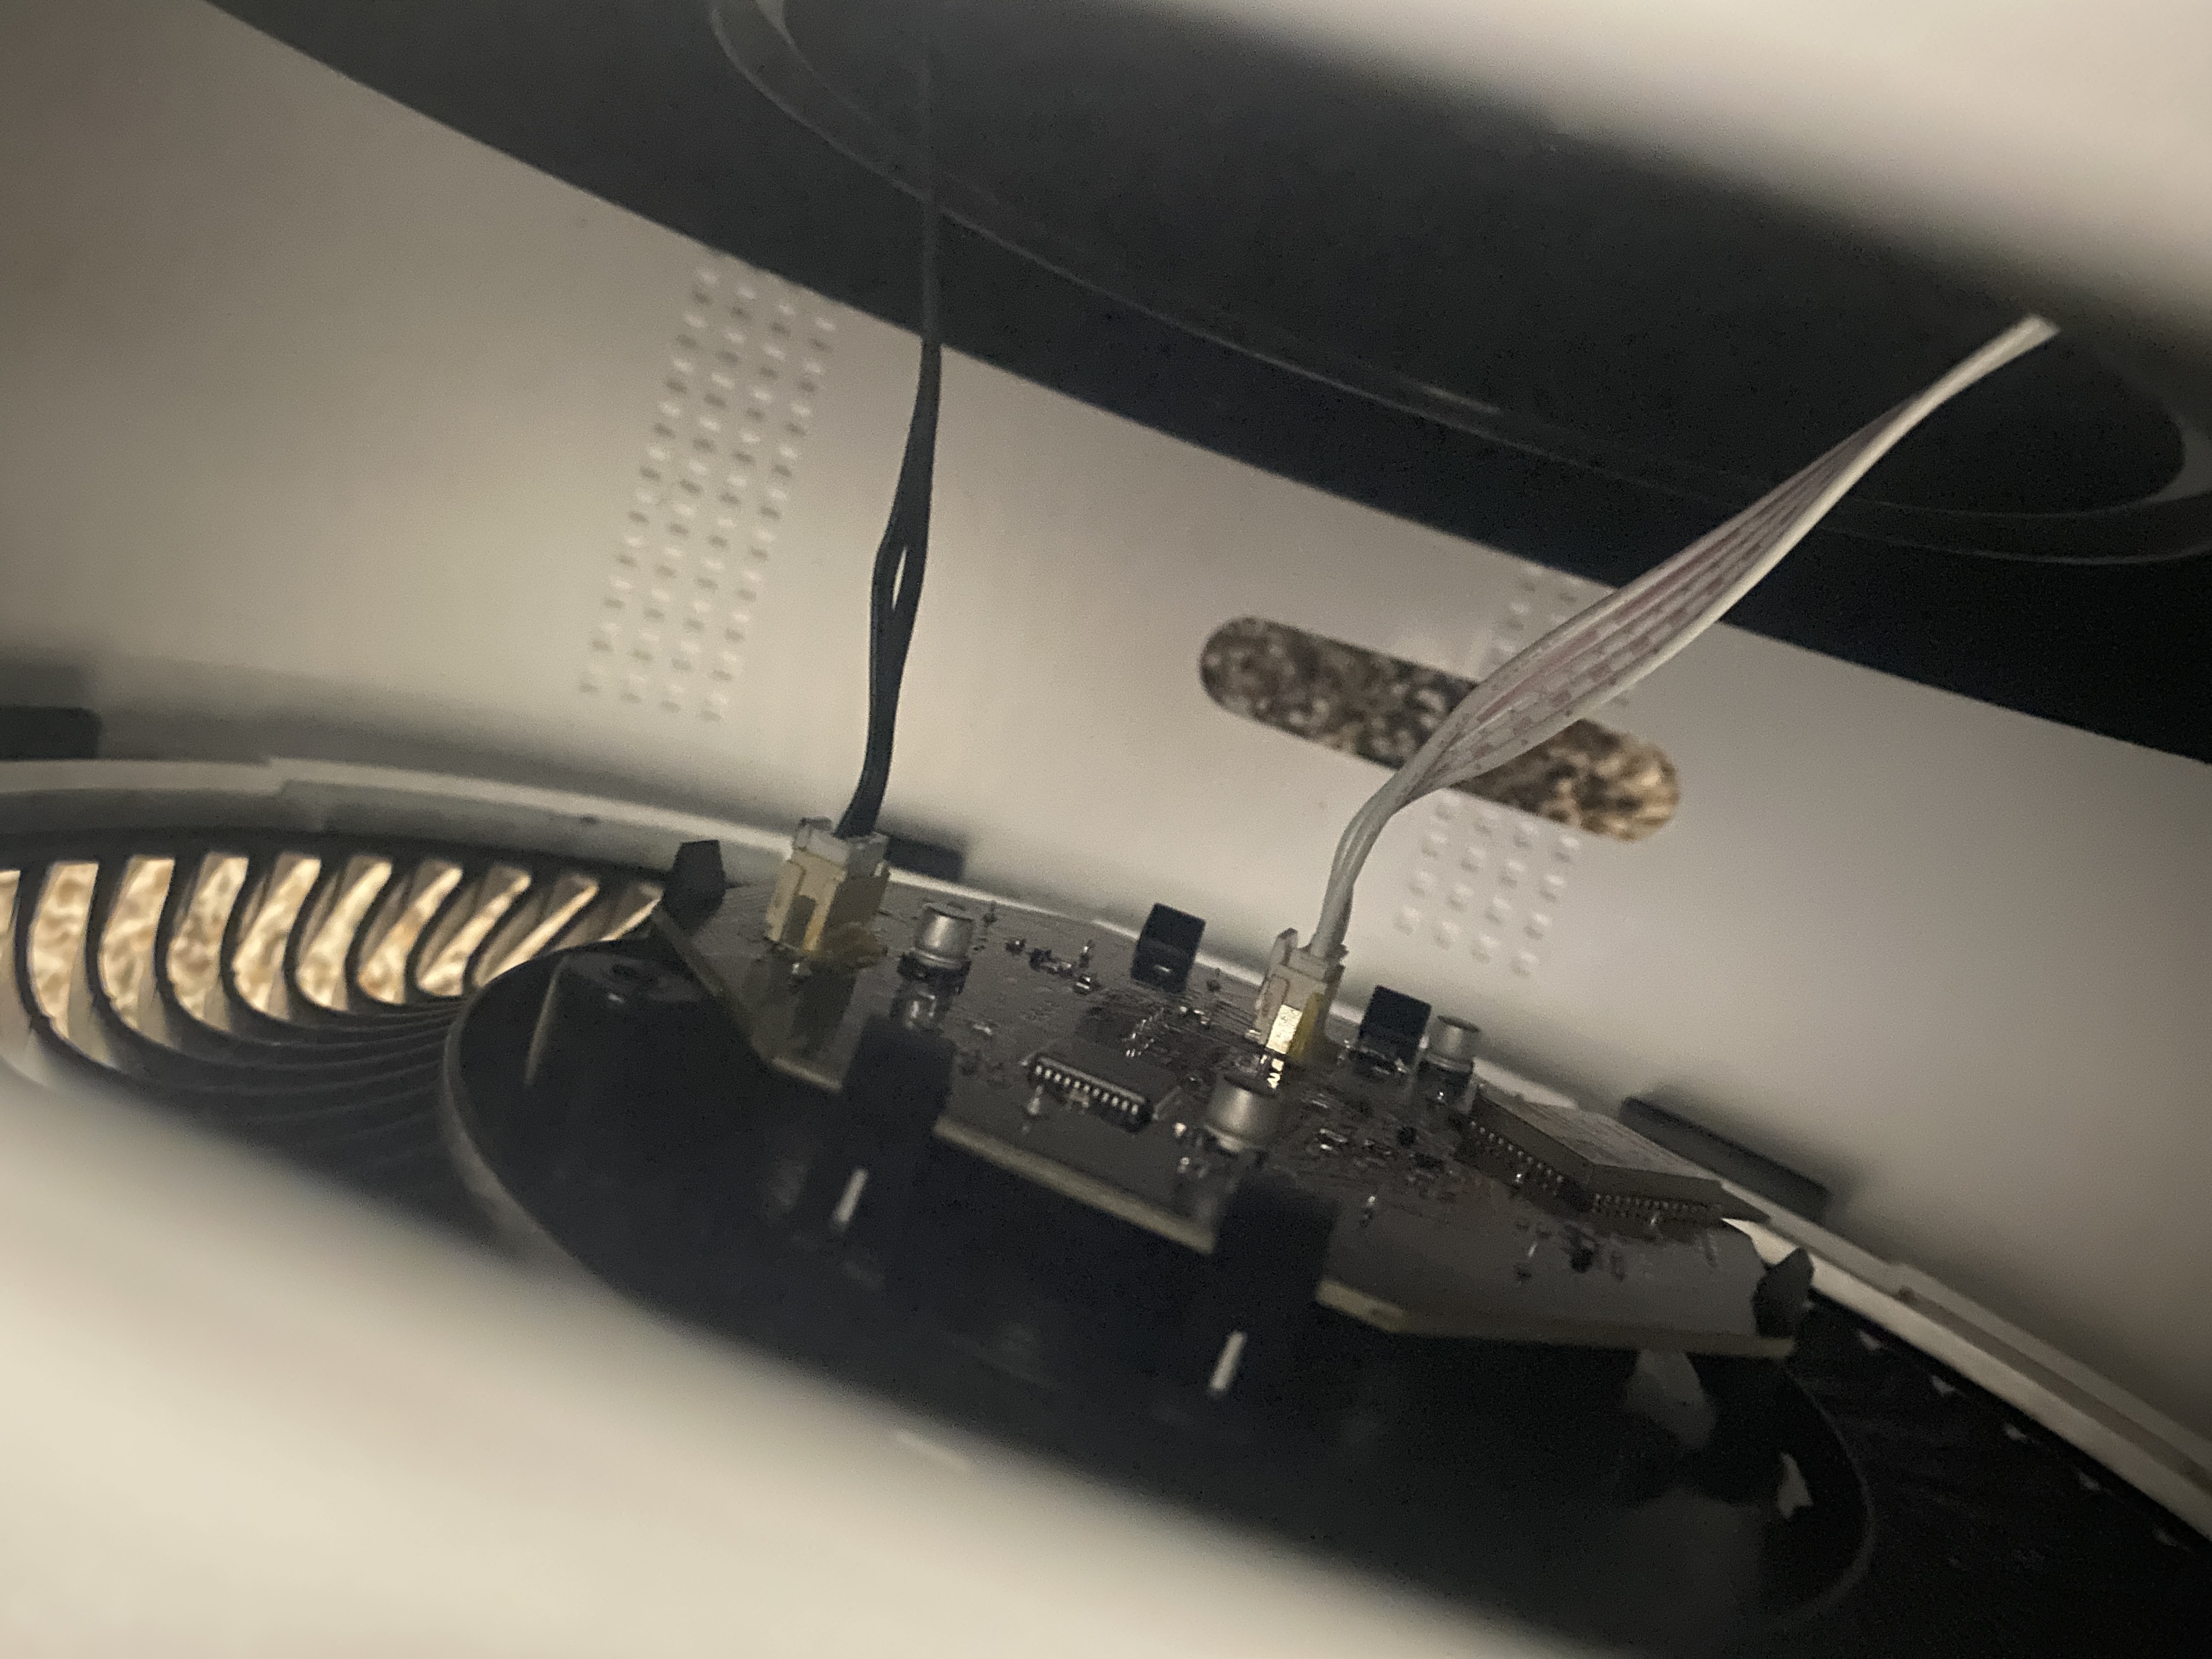
The next step, which I’ll spare you some of the details on, included reversing the board and determining the UART pins. In the aforementioned blog post, no detail was described on this process, so I’ll briefly talk about what I needed to do in order to backup and flash the ESP32 onboard.
Things to know: - The standard UART pins are 3v3, GND, RX, and TX.
Steps:
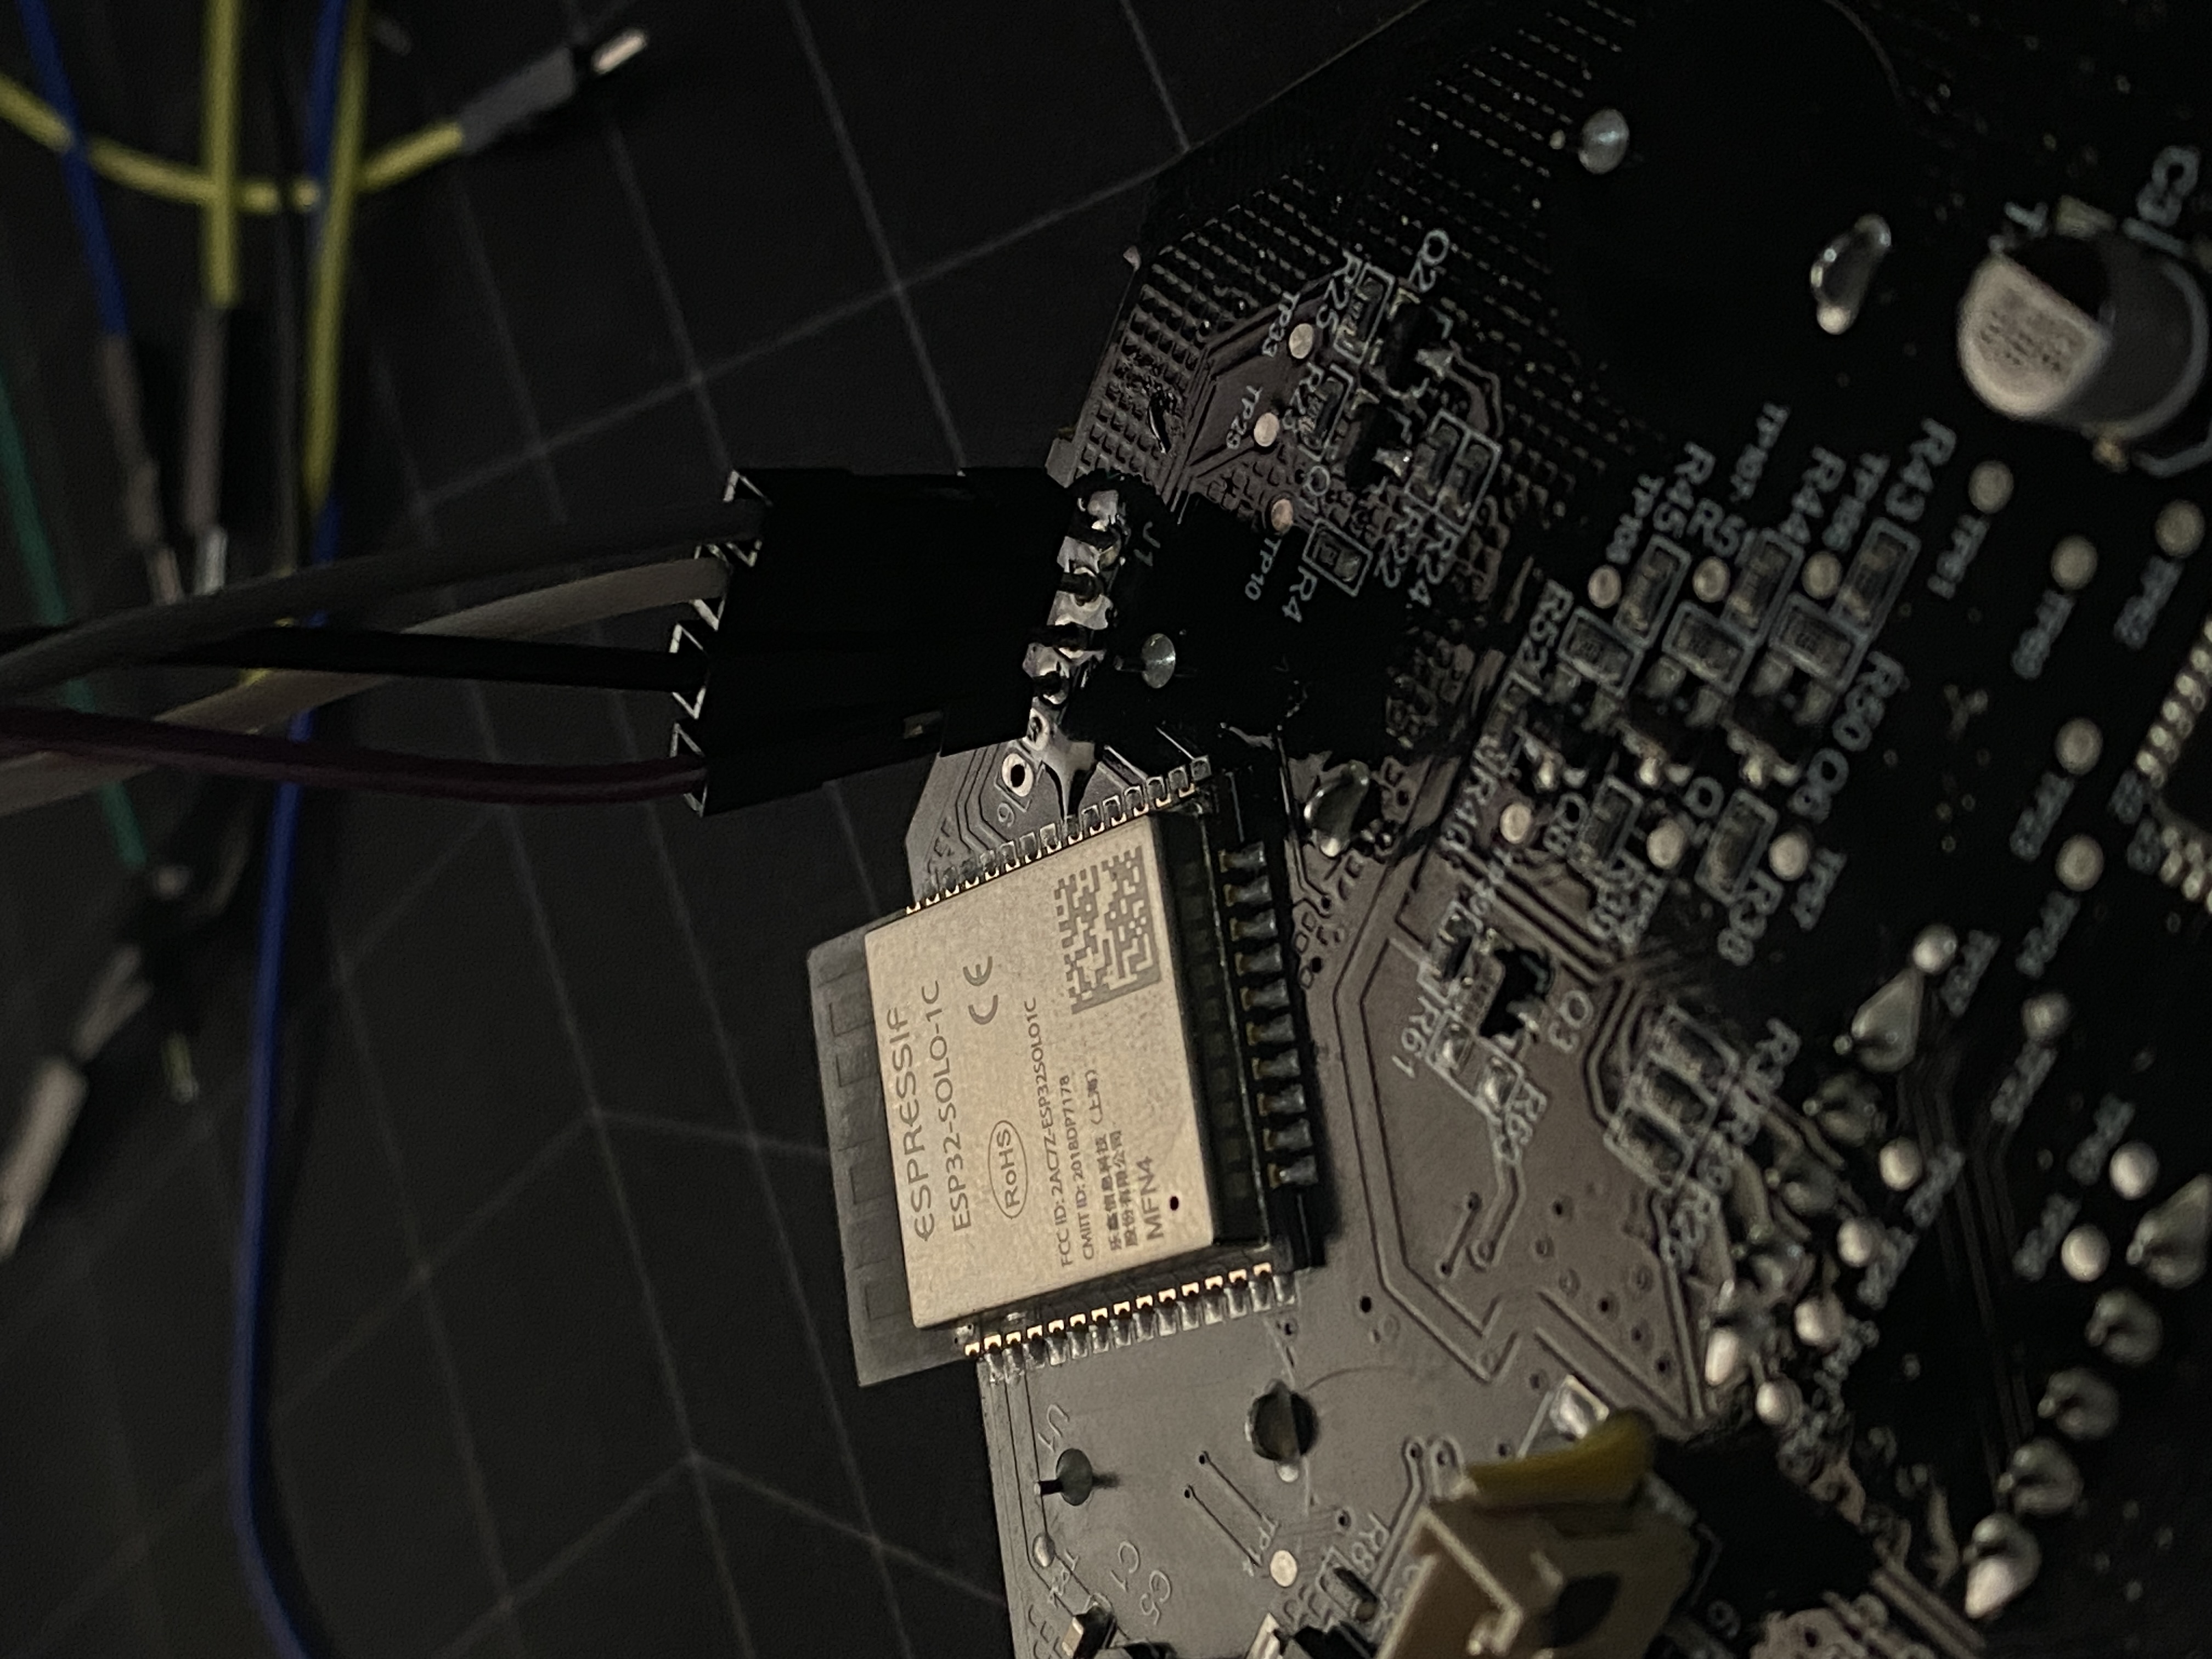
- Find the datasheet for the ESP32 onboard. The ESP32 on my device was the ESP32-SOLO-1C variant.
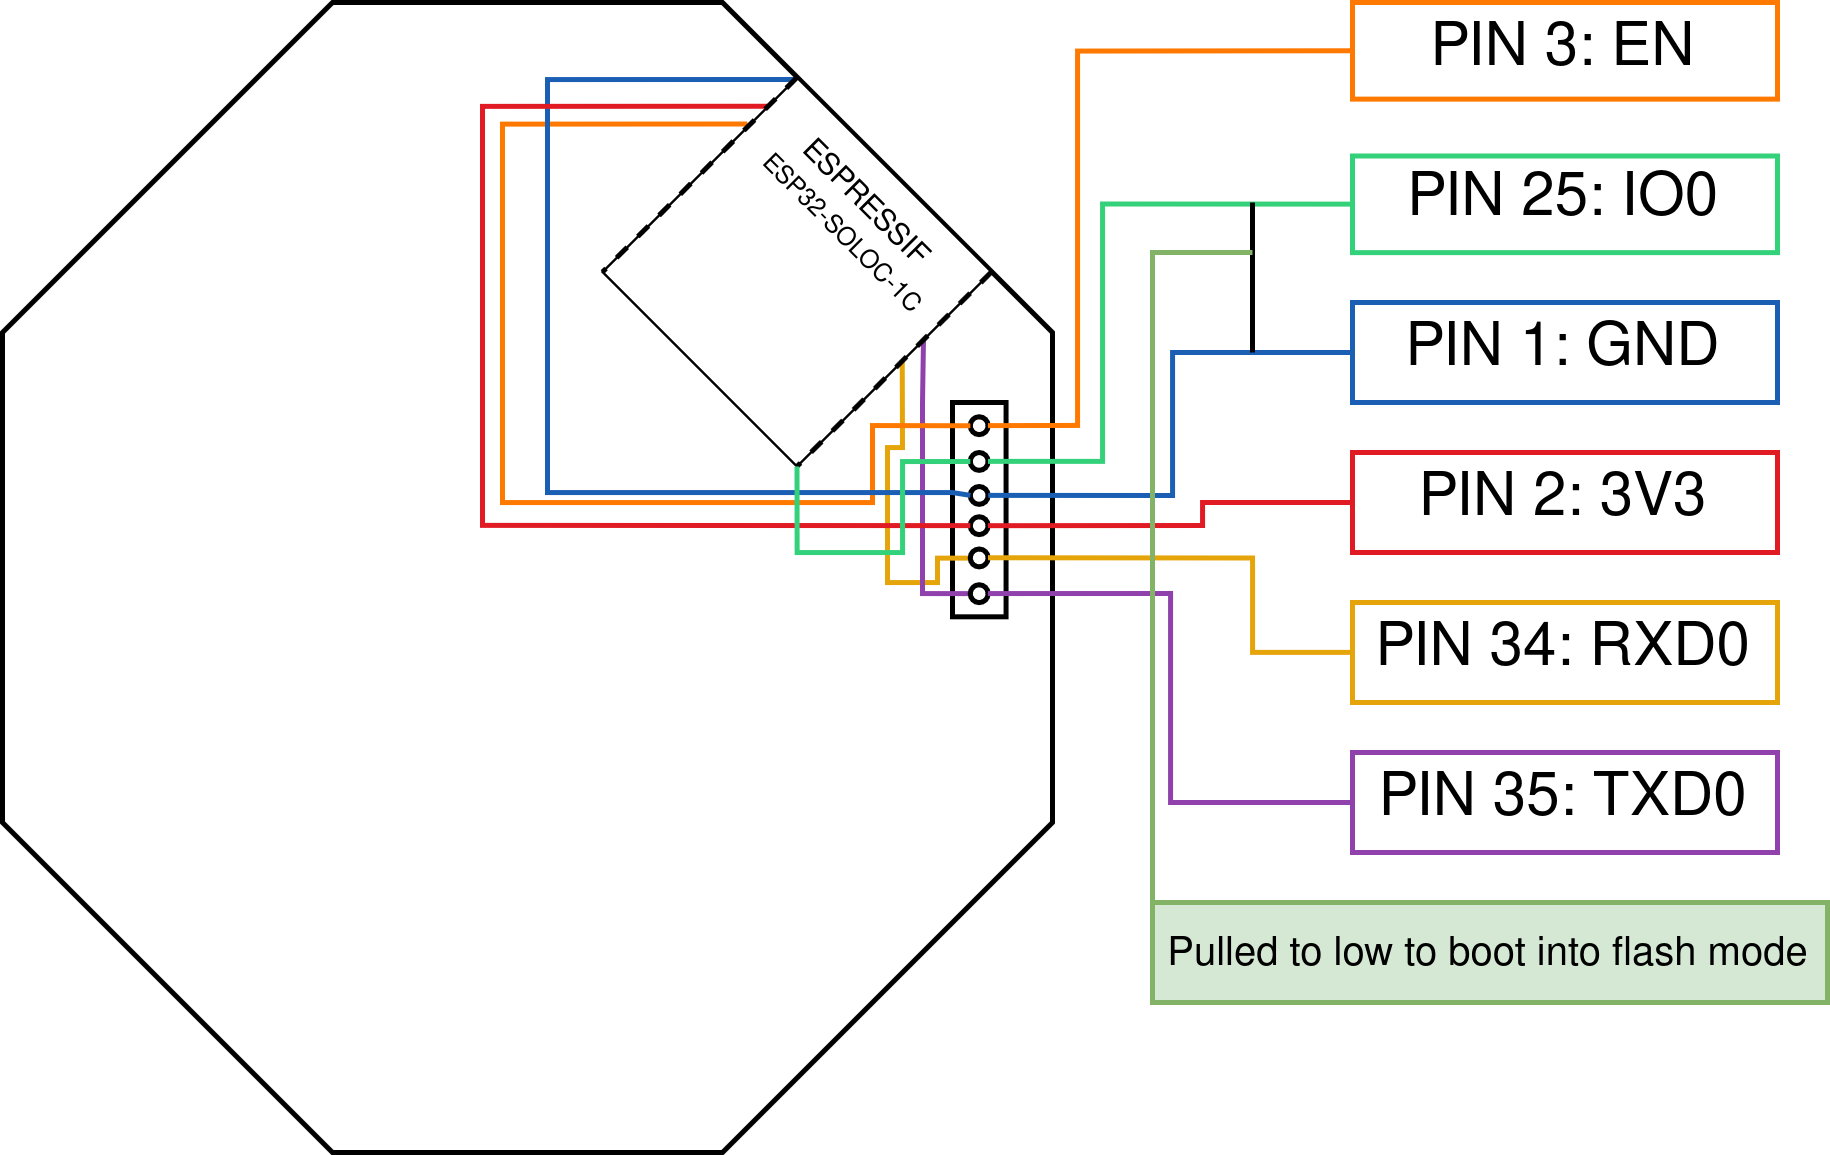
- Determine which pins are UART. In the case of the ESP32-SOLO-1C, the following pins are laid out like so (2.1 Pin Layout in the link above):
- PIN1: GND
- PIN2: 3V3
- PIN3: EN
- PIN25: IO0
- PIN34: RXD0
- PIN35: TXD0
Pin 3 and 25 are mentioned above for extra reference. This is not the layout of the 6 pins shown in the image below. Refer to the diagram below the image for the layout of the UART pins.
- After you’ve found the pins on the datasheet, for each pin on the physical ESP32-SOLO-1C, test continuity across each lead and determine where they correspond to. On the Core 400S, six pin-outs are provided that map to the four pins we previously determined for UART - one for IO and one for EN.
After I determined my pins I needed to communicate with the ESP32, it was time to flash the board.
To flash the ESP32, you need to enter flash mode. Most consumer ESP32s come with a dedicated flash button. Since Levoit didn’t anticipate amateur hackers to flash their board, you won’t find a dedicated boot button on board to enter flash mode. There is, however, an alternative to using the boot button. IO0 is associated with the boot button on consumer boards. Connect pin IO0 to ground and plug power the device on to enter into flash mode. OTA is an option after the custom firmware has already been installed (i.e. ESPHome).
Before flashing our custom firmware, it’s best to make a backup of the existing firmware in case something goes south. To backup the Levoit firmware, you can run the following command after the device is connected:
esptool.py --port /dev/ttyUSB0 read_flash 0 ALL levoit.bin
Now that the device is in flash mode, it’s time to create the firmware and deploy it onto the ESP32. When deploying, providing power to the device entirely through it’s provided power supply is not required, and not recommended for safety.
Using the template provided by esphome-levoit-air-purifier, I was able to use esphome run levoit.yaml --device=/dev/myUSB0 to deploy the custom ESPHome firmware onto the device. NOTE: If you’re hacking a Levoit Core 400S, make sure to specify the model of the device for the Levoit custom firmware. If this is unspecified, Core 300S is selected by default and does not work with the 400S device.
esphome:
  name: "levoit-air-purifier"
  friendly_name: "levoit-air-purifier"

esp32:
  board: esp32dev
  framework:
    type: esp-idf
    sdkconfig_options:
      CONFIG_FREERTOS_UNICORE: y

external_components:
  - source: github://acvigue/esphome-levoit-purifier
    components: [levoit]

logger:
  baud_rate: 115200

# Enable Home Assistant API
api:
  password: ""

wifi:
  networks:
    - ssid: !secret wifi_ssid
      password: !secret wifi_password

captive_portal:

uart:
  tx_pin: GPIO17
  rx_pin: GPIO16
  baud_rate: 115200

levoit:
  id: levoit1
  model: core400s # IMPORTANT - this defaults to core300s

fan:
  - platform: levoit
    name: Levoit Purifier

sensor:
  # Uptime sensor.
  - platform: uptime
    name: Uptime

  # WiFi Signal sensor.
  - platform: wifi_signal
    name: WiFi Signal
    update_interval: 60s

  # PM2.5 sensor
  - platform: levoit
    pm_2_5:
      name: PM2.5
    air_quality:
      name: Air Quality Index

switch:
  - platform: levoit
    display_lock:
      name: "Display Lock"
    display_on:
      name: "Display On"
    power:
      name: "Master Power"

select:
  - platform: levoit
    fan_mode:
      name: "Fan Mode"
    auto_mode:
      name: "Auto Mode"
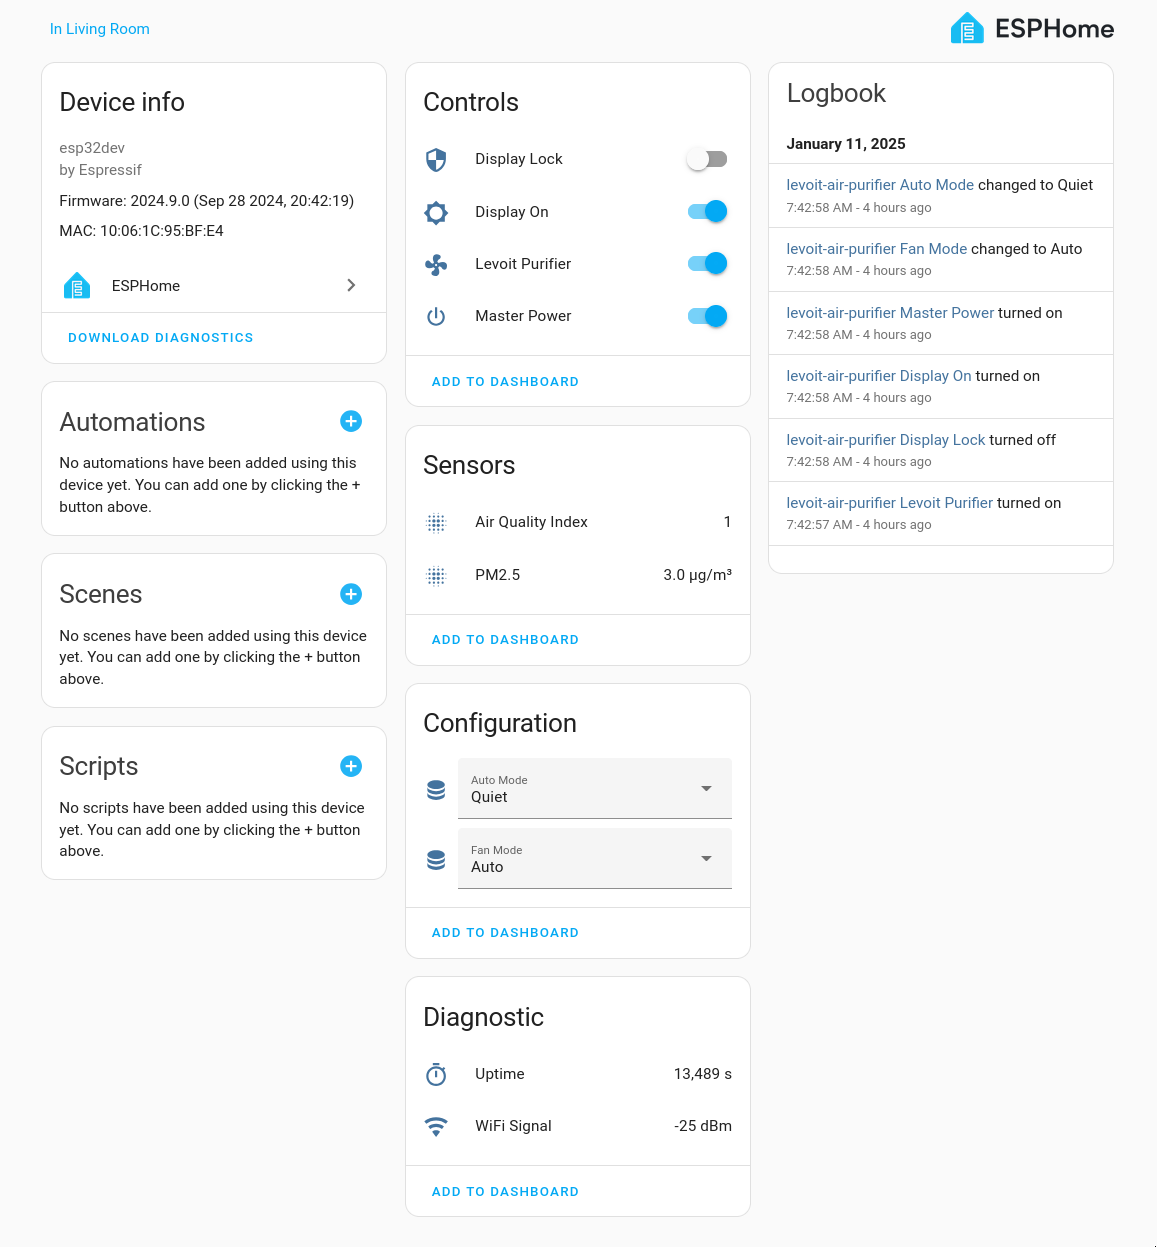
After installed, the device log is presented and followed for debugging purposes. At this point, it’s probably best to provision the device within Home Assistant. If the device is on the same network as Home Assistant, the device should automatically be detected by HA. You might be asked to provision the device within your ESPHome instance first - if this is the case, do that, and then provision it in HA. Device sensors/functionality might be missing at this point in HA after the device has been added, which is expected if the power supply isn’t connected to the Core 400S. If no issues arise,
Ctrl + cwill both stop the log and execution of the firmware. Disconnecting and reconnecting the device will make the device reboot and restart the firmware. At this point, it’s probably best to try to connect the power supply to the device and verify the controls and data flowing into Home Assistant are working as expected.If all is well, it’s time to reassemble the device, hopefully with a few less sentence enhancers than during disassembly. Reassembling the device is the steps in backwards order, however, the most difficult part will likely be to reconnect to the two ribbon cables to the device’s control panel. I used a butter knife to maneuver the cables into the connectors. It was easier than disassembly since it didn’t require applying pressure to the button on the connector, but it did take some finessing.
Looking at Home Assistant, the device is now provisioned and controllable from the UI. Sweet!
 There we have it, a smart air purifier without a connection the cloud, and all locally controllable. When my internet goes down, I can still control my air purifier (as impractical as that seems to be).
Most of this project was for the learning experience of messing with electrical components and learning how to make do with what tools I had. I hadn’t ever disassembled and hacked a product I purchased to this capacity in success. A year back I attempted to JTAG hack my Xbox 360 with the goal I’d be able to install Linux and run a server off of it, but failed in the process, while trying to solder connections to the board.
I’m proud of what I learned and accomplished with this project! Did I void my warranty? Probably. Did I have one? Probably not. Do I mind if I did have one? Not really. There were many times I was scared I had bricked or was one bad move away from bricking my air purifier. I confidently continued trying to get the device back to working states and was happy to finally conclude the project.
I’m happy to say this project was a success, and I’m more confident to take on more projects like this in the future!